In the final months of 2005, Mitsubishi Materials released
an important new material that will replace its original gold
Precious Metal Clay. The new product is a 22 karat alloy of
silver and gold that has superior strength, color, durability,
and firing options over its predecessor. This page is intended
to offer technical specifications and tips for working with
the new material. It will be updated as more information becomes
available.
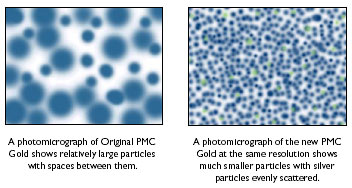
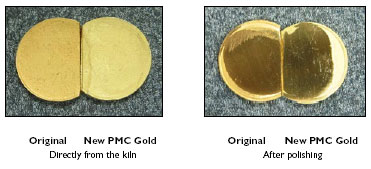
Q. How is this different from original PMC Gold?
A. When Mitsubishi Materials released its first gold in the
mid-1990s, it was pure (24k). It required a two hour firing
at 1800˚ F (1000˚ C), and it was relatively soft.
The shrinkage rate was over 25%. This material is very similar
to PMC3, with the same shrinkage rate (about 12%), a wide range
of firing options, and greater strength.
Q. How did they do this?
A. Through a combination of a carefully chosen alloy, a sophisticated
binder, and incredibly small particle size. All this is the
result of lessons learned over the last decade in the development
of PMC+ and PMC3.
Q. Can I combine the gold with silver PMC?
A. Yes, easily. You can lay this gold onto, under, or beside
any version of silver PMC, though PMC+ and PMC3 are preferred
because they most closely match the firing schedule and shrinkage.
Treat the joint just as if you were attaching two silver PMC
parts together—press side by side, and add a drop of
water or a small bit of paste to secure the joint.
Q. Can I attach gold ornaments to PMC that has already been
fired?
A. It is best to arrange for a mechanical grip when attaching
Gold PMC to an object that has been fired to insure a strong
joint. For instance, make a hole into or through the silver
and press the gold into place so that it fills that hole. Similarly,
wrap the gold element around the silver one so it is locked
in place after firing. PMC Gold elements can be soldered to
silver or other metal elements by traditional silver soldering
methods after firing.
Q. How about scraps? Can I reuse them?
A. Absolutely, and because of the high price of gold, you’ll
probably be more concerned about this than with silver. Start
by cleaning your work area well, and laying down a paper or
sheet of plastic that will catch all your bits and pieces.
Use tools that do not soak up the gold. For instance, I stir
my gold paste with a large needle rather than a wooden toothpick.
I can scrape every bit of gold off the needle, but the wood
will absorb some that will be difficult to recover. Rubber
tools like a Color Shaper are ideal because whatever gold dries
on the tip will fall off when the rubber is flexed.
These scraps can be converted to paste by adding a little bit
of clean water. Allow an hour or more for the water to penetrate,
then shake or stir well to achieve a smooth consistency. Dedicate
a good quality paintbrush to the gold, and pinch it clean at
the end of each use. Whatever gold is in the brush will dry
there; when you use the brush next time, moisten with water
and this gold will become soft. This is better than rinsing
your brush out each time because that method leaves the gold
in your water jar.
To convert paste to clay, allow it to dry to a yogurt consistency,
then scoop it onto a sheet of plastic wrap so it can dry a
little more. Check every hour so you can catch it at the proper
point. When it seems like soft putty, put a lot of olive oil
on your fingers, and gently knead the lump into a ball of clay.
This should be very similar to the way the gold appeared when
you first opened the package.
Q. What can I do with gold scraps after they have dried completely?
A. Either wrap them in plastic after wetting very well, or
sand the lump to make a fine gold dust. Mix this with water
to make paste. This slip can be painted in layers just like
silver slip.
Q. Is there a syringe style of this gold?
A. Not yet, but the scientists at Mitsubishi are working on
it.
Q. Can I alloy the new gold with silver?
A. It’s possible to do this, but we don’t recommend
it. The 22k alloy was developed after years of testing. If
you “dilute” the gold by adding more silver PMC,
the color will quickly become pale, even getting to the point
where it looks like tarnished silver.
Q. Can I add copper to make a lower karat?
A. Because copper oxidizes so quickly, it cannot be added to
this material. That is why we don’t have a sterling version
of PMC—the same factors apply here.
Q. What happens if I fire Gold PMC longer or hotter than recommended?
A. As with silver PMC, longer firing time is fine. Going hotter
than the melting point of the material is a major no-no. In
this case, you should not heat above 1650˚ F (900˚ C).
This same rule and same temperature applies to all versions
of silver PMC.
Q. Any tips on torch firing?
A. PMC Gold can be handled like PMC3 silver. It is important
to allow the piece to dry completely, and this will take longer
than with other forms of PMC because the material is so dense.
Overnight drying is best if possible. Set the work on a soldering
pad and warm to dry off remaining moisture and to burn away
the binder. Bring the object to a vibrant, glowing red color
and hold it at this temperature for at least two minutes. Rather
than look away at a clock, I prefer to keep my attention focused
on the glowing object and guess the time. Err on the side of
caution, holding the heat until you are certain that a couple
minutes have passed.
Q. How do I inlay the gold into silver?
A. Make a piece of silver PMC+ or PMC3, either with recesses
or so that it can be carved when leather hard. To fill the
recesses, either apply multiple coats of PMC Gold slip or press
small bits of gold clay into the recesses with a tool. Fire
at any of the schedules for these two materials. If you polish
to a bright shine, you’ll find that the gold inlay is
difficult to see because the reflective qualities of gold and
silver are almost identical. For this reason, most people darken
the silver to make a contrast.
Q. Can I set stones in PMC Gold?
A. Yes, exactly as you do in silver PMC. Gems that can withstand
firing temperatures (which for gold are as low as 1290˚ F
/ 700˚ C), can be fired in place. For other gems, make
a seat that is approximately the right size, then set the stone
with conventional techniques after firing and finishing are
complete.
Q. I heard about mokume-gane with this gold. How does that
work?
A. Roll out a sheet of PMC Gold and an identical sheet of silver
PMC3, and lay one on top of the other. Cut the stack in half
and place one piece on top of the other. Roll thinner, cut
again, and restack. Continue in this way (or variations on
it) to make a panel with alternating layers of silver and gold.
Carve or drill openings in the panel… imagine a very
miniature version of the Grand Canyon, in which the walls of
your carving show the layers of the stack. Re-dampen if needed,
then roll again to make the surface flat. The layers will appear
as concentric or parallel bands of color. Fire at any of the
recommended schedules, and finish as usual.
Q. Can I enamel on PMC Gold?
A. Yes, exactly as you would on conventional gold. Fire the
PMC first, finish to the desired shine, then apply enamels
in any of the conventional ways.
Q. How do I polish PMC Gold?
A. PMC Gold can be polished with any of the methods
used for other kinds of PMC, like hand burnishing, tumbling,
scratchbrush, steel wool, and buffing (after burnishing). We
recommend that you burnish the work at least a little before
using a buff. Firing leaves a microscopic “tooth” on
the metal, and if you go directly to a fabric buff, the surface
gets clogged with compound. Scratchbrush, tumble, or rub with
steel wool to compact the surface, then use any buffs you would
use in a traditional polish.
|
|
|
 |
|